Results 1 to 24 of 24

Thread: Eastern Yellow Robin

  1. #1
    BPN Viewer
    Join Date
    Feb 2013
    Location
    Australia
    Posts
    37
    Threads
    3
    Thank You Posts

    Default Eastern Yellow Robin

    http://www.lirralirra.com/wp-content...im_Wormald.jpg

    As a newie this is the first time I've tried to post an image, I'm not sure yet if I'm talking to myself or if it will work!

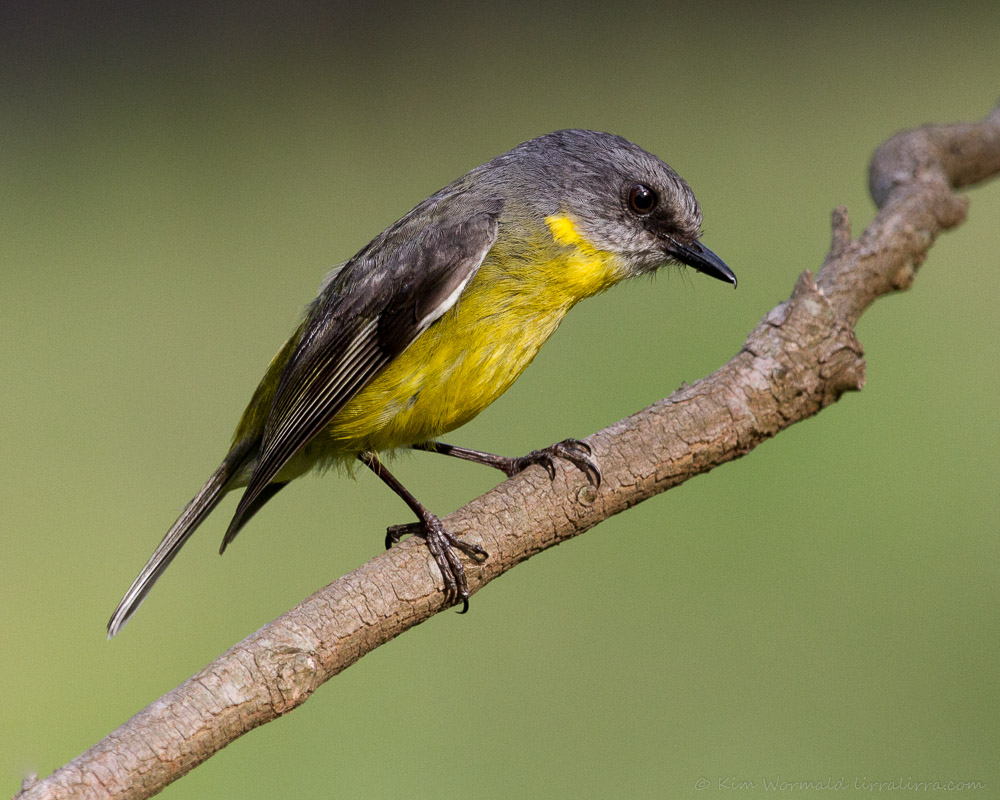
    Canon 7D, 100-400mm, 1/640, f/5.6, ISO 640, focal length 375m

    As shot apart from cropping, +0.20 exposure, +50 clarity, +10 vibrance.

    I used LR4 for post-processing but now have PS11 too. I usually hope for eye-contact but sometimes I like seeing a bird intent on its business.

    I'd appreciate ideas, thank you.

  2. #2
    BPN Viewer
    Join Date
    Dec 2012
    Location
    Trinidad & Tobago
    Posts
    329
    Threads
    17
    Thank You Posts

    Default

    Hey Kim - fantastic shot here. You got a lovely pose with a nice catchlight in the bird's eye. It does look intent on whatever it's looking at! Nice uncluttered BG, although it looks a tad noisy. Still a great photo! Keep 'em coming!

  3. #3
    BPN Viewer
    Join Date
    Feb 2013
    Location
    Australia
    Posts
    37
    Threads
    3
    Thank You Posts

    Default

    Thank you Faraaz. I'm sorry I didn't post the image properly. I often have trouble with noise at practically all ISOs and don't understand why.

  4. #4
    Forum Participant
    Join Date
    Oct 2012
    Location
    Reno, NV
    Posts
    155
    Threads
    13
    Thank You Posts

    Default

    Beautiful Shot Kim. I like the expression you caught and the lovely colors.

  5. #5
    Forum Participant
    Join Date
    Jan 2008
    Location
    Euclid, Ohio
    Posts
    1,031
    Threads
    188
    Thank You Posts

    Default

    Kim...when you sharpen...are you applying that just to the bird or to the bird and the background?
    If you're applying the sharpening to the background, that's where your noise is coming from.

    What I typically do is, put the bird on its own layer. Then with the other layer, I'll apply any noise reduction
    that the background might need, or maybe a slight gaussian blur, among other things.

    Doug

  6. #6
    BPN Viewer
    Join Date
    May 2012
    Posts
    2,812
    Threads
    180
    Thank You Posts

    Default

    Nice subject isolation Kim and liking the side on pose.....it looks somewhat underexposed which will also account for noise problems and if you did overall sharpening on the whole image rather than just the subject. One can tweak underexposure in PS/Lightroom etc, but often it come as at a loss of IQ in other forms ...best to get it right in camera ort very close to right

  7. #7
    BPN Viewer
    Join Date
    Feb 2013
    Location
    Australia
    Posts
    37
    Threads
    3
    Thank You Posts

    Default


    Thank you Alison.

    Doug - I had applied clarity to the entire image. I'll post a new version that I've worked on in LR, focusing on the bird not the bg. I haven't used PS11 layers yet or gaussian blur but will start looking at tutorials. Do you use the quick selection tool to put the bird on its own layer?

    Phil - I totally agree re getting it right in camera, that's what I'd like to work towards. What's IQ? As I mentioned to Faraaz I have trouble with noise, also with underexposure. I've tried various settings but haven't worked out what's causing the problem (apart from me, though I thought it was the camera for a while).

    Thank you all for your comments, I really appreciate your time.

  8. #8
    Forum Participant
    Join Date
    Feb 2009
    Location
    Perth Western Australia
    Posts
    2,546
    Threads
    171
    Thank You Posts

    Default

    Hi Kim...

    Good start here.. Nice and sharp and good background separation Agree with the "it looks under exposed". IQ stands for Image Quality, and another thing that you could search of on this site is the "expose to the right" process which should help with noise along with the suggestions above..

    DON

  9. #9
    BPN Viewer
    Join Date
    Feb 2013
    Location
    Australia
    Posts
    37
    Threads
    3
    Thank You Posts

    Default

    Thanks Don. It won't let me search for "expose to the right" but I think it'll be exposure compensation. I've been forgetting to use it after washing-out some lorikeets a while back, I'll keep it in mind now you've reminded me. I'm on a steep learning curve, hopefully my IQ will improve!

  10. #10
    Forum Participant
    Join Date
    Jan 2008
    Location
    Euclid, Ohio
    Posts
    1,031
    Threads
    188
    Thank You Posts

    Default

    I'm starting to use the quick selection tool. I use to just quick mask the bird, but i'm
    getting more away from that.

    I also gave up using Lightroom. I strictly use Canon's Digital Photo Professional. Between
    that and BreezeBrowser, that's all I need until I get to Photoshop.

    I do like your repost.

    Doug

  11. #11
    BPN Viewer
    Join Date
    Feb 2013
    Location
    Australia
    Posts
    37
    Threads
    3
    Thank You Posts

    Default

    Thank you Doug :)

  12. #12
    Wildlife Moderator Steve Kaluski's Avatar
    Join Date
    Nov 2009
    Location
    Somewhere in the world
    Posts
    20,690
    Threads
    1,296
    Thank You Posts

    Default

    Hi Kim, if you are using LR4 then you should be looking at around anywhere between 4 & say 12 for Clarity, beyond that you will hammer the image. LR3 then somewhere around 20-30. This is perhaps why the image may look a little sooty?
    Post Production: It’s ALL about what you do with the tools and not, which brand of tool you use.

  13. #13
    BPN Viewer
    Join Date
    Feb 2013
    Location
    Australia
    Posts
    37
    Threads
    3
    Thank You Posts

    Default

    Hi Steve, I'll check that, thank you. I'm still not sure of the difference between clarity and sharpen. Would it ever be okay to use a higher level of clarity if applied to just one part of the image or is it always likely to cause problems? On the repost I used 20-30 for clarity on the bird only and no sharpening.

  14. #14
    Wildlife Moderator Steve Kaluski's Avatar
    Join Date
    Nov 2009
    Location
    Somewhere in the world
    Posts
    20,690
    Threads
    1,296
    Thank You Posts

    Default

    Hi Kim, the modules in LR & PS (ACR) are designed in such a way to lead you through the correct procedure and steps, to ensure you process your images in the correct manor, and each 'element' has a 'cause & effect'.

    ALL digital images need some form of sharpening, and quite often no two images are the same same, so you may need more or less depending.

    The Clarity slider basically increases the midtone contrast in a way that gives your image more punch and impact without actually sharpening it! Normally I would suggest you view your image at 100% to see the effect the slider has, but nowadays you can probably get away with 50%. You need to also look at using the sliders in the sharpening module, as you can apply some pre-sharpening before exporting, then you need to apply some sharpening after you have cropped and resized for web. The current LR 4 ($.2) has really been upgraded since 3 and the controls are more refined IMHO, ditto ACR 7.

    In LR you really need to master the Sharpening module: Amount, Radius, Detail & Masking, as these are your key sliders, although the radius may decrease or increase magically ie 0.8- 1.2 as 1 normally seems to suit.

    If you want to forward you RAW via Dropbox i will take a look and either send back, or RP the image to hopefully illustrate the difference, just let me know, however I will be flying out to canada in the next few days so limited time.

    Hope this helps.

    Steve
    Post Production: It’s ALL about what you do with the tools and not, which brand of tool you use.

  15. #15
    BPN Viewer
    Join Date
    Feb 2013
    Location
    Australia
    Posts
    37
    Threads
    3
    Thank You Posts

    Default

    Hi Steve, I'm rapt to have this info! I haven't been using the sharpening module at all and don't (yet) even understand what radius and detail are. I'm going to try sending a RAW file via Dropbox, hopefully I'll get it to you before you land in sunny Canada.

  16. #16
    Wildlife Moderator Steve Kaluski's Avatar
    Join Date
    Nov 2009
    Location
    Somewhere in the world
    Posts
    20,690
    Threads
    1,296
    Thank You Posts

    Default

    Kim, are you Mac or PC based?

    email to steve@untamedimages.co.uk
    Post Production: It’s ALL about what you do with the tools and not, which brand of tool you use.

  17. #17
    BPN Viewer
    Join Date
    Feb 2013
    Location
    Australia
    Posts
    37
    Threads
    3
    Thank You Posts

    Default

    PC Steve. I've just pm'd you re my dropbox debacle ...

  18. #18
    Wildlife Moderator Steve Kaluski's Avatar
    Join Date
    Nov 2009
    Location
    Somewhere in the world
    Posts
    20,690
    Threads
    1,296
    Thank You Posts

    Default

    Kim, is this the RAW file or your worked on file?
    Post Production: It’s ALL about what you do with the tools and not, which brand of tool you use.

  19. #19
    Wildlife Moderator Steve Kaluski's Avatar
    Join Date
    Nov 2009
    Location
    Somewhere in the world
    Posts
    20,690
    Threads
    1,296
    Thank You Posts

    Default

    Attached Images Attached Images
     
    Hi Kim, here you go.

    Very little work done as the file was well exposed. This is with +10 Clarity, then just some sharpening applied, although I did open up the slightly darker areas using the sliders to bring out more detail & no NR applied. Cropped & resized, then two more rounds of selective sharpening. Hopefully this will show the comparison and by applying your high level of Clarity how much black there was.

    Remember this is ISO3200, not 200 if anyone is viewing.

    Hope this has helped you Kim.

    cheers
    Steve
    Post Production: It’s ALL about what you do with the tools and not, which brand of tool you use.

  20. #20
    BPN Viewer
    Join Date
    Feb 2013
    Location
    Australia
    Posts
    37
    Threads
    3
    Thank You Posts

    Default

    The difference is clear though I'm not 100% sure how you've done it. I'll definitely keep the clarity much lower. I like the crop giving the robin more space to look into. Which sliders did you use to bring out detail, and what is NR? Noise reduction?? Is the selective sharpening for specific parts of the bird? How much sharpening and why did it need more after being cropped and resized? My data says the ISO 640, I often get a lot of noise even with lower ISO.

    It's awesome help Steve, thank you! Kim

  21. #21
    Wildlife Moderator Steve Kaluski's Avatar
    Join Date
    Nov 2009
    Location
    Somewhere in the world
    Posts
    20,690
    Threads
    1,296
    Thank You Posts

    Default

    Attached Images Attached Images
     
    Hi Kim, very little, just adjusted a few sliders, but there was still a little choking in the black areas, but nothing IMHO to worry about after the tweaks here. Personally I feel it's nice to give the subject room to breathe, however, on occasions it's quite nice to go tighter, but some people like to fill the frame NR is noise reduction, you just need to master the four I spoke about, as it's all about high & low frequency, but the sharpening in your image was 'Global' thats across the whole image, so look at the BKG on the high res file, not bad? You can if you wish apply specific, or selective sharpening to areas if you wish, again just personal choice via the adjustment brush. I never am specific on sharpening, as over the years I have found it's so personal again, therefore I tend not to disclose, as in the past people then use it and sometimes feel it's too little or too much so that is why. You can refine more if you so wish, I just wanted to hopefully illustrate that Clarity is not the way to go. You can of course use Curves, Levels, Adjustment layers, Tonal layers etc to continue building your image, it's just how far you need/want to go. Perhaps the image could take some small adjustments in say selective colour, but I think you use Elements, so not sure how that works.

    Sorry, my error on the ISO, it is 640.

    Just to start you off here you go, but again, YOU can refine it to your own tastes.

    cheers
    Steve
    Post Production: It’s ALL about what you do with the tools and not, which brand of tool you use.

  22. #22
    BPN Viewer
    Join Date
    Feb 2013
    Location
    Australia
    Posts
    37
    Threads
    3
    Thank You Posts

    Default

    Steve, at last I'm stealing a minute to read your post. Thank you SO much for all the info and pointers. Some background knowledge seems assumed in books and online tutorials so it's awesome to have questions answered so clearly and with specific relevance to bird photography. My camera hasn't been working properly for the past few days, it's so disappointing. Anyways, hopefully I'll work out what's wrong without having to send it away and in the meantime I'm off to tweak some sliders.

    Have a great time in Canada, happy birding, Kim

  23. #23
    Wildlife Moderator Steve Kaluski's Avatar
    Join Date
    Nov 2009
    Location
    Somewhere in the world
    Posts
    20,690
    Threads
    1,296
    Thank You Posts

    Default

    You are welcome Kim, just heading off in a couple of hours, hope you get you camera fixed soon.

    Cheers
    Steve
    Post Production: It’s ALL about what you do with the tools and not, which brand of tool you use.

  24. #24
    Forum Participant
    Join Date
    Feb 2010
    Location
    Rotonda West , FL
    Posts
    3,642
    Threads
    198
    Thank You Posts

    Default

    Nice image Kim with a great perch and clean bg. I agree with suggestions made and your repost is an improvement. Steve's advice IMO has brought out the best of an already great image. Keep them coming.

Posting Permissions

  • You may not post new threads
  • You may not post replies
  • You may not post attachments
  • You may not edit your posts
  •  
Web Analytics