Results 1 to 47 of 47

Thread: BEFORE and AFTER (An Exercise Project)

  1. #1
    Fabs Forns
    Guest

    Exclamation BEFORE and AFTER (An Exercise Project)

    Attached Images Attached Images
     
    We are going to have this thread as a project, where you can post and image as it came out of the camera as before and what you did to if as an after. You would need to briefly explain what you did to arrive at the final image.

    This is not a discussion in ethics or what should be done. Simply, what CAN be done with the help of software and it is meant to instruct and help those who are interested in learning.

    Please try to post the two images together in one image not exceeding 800 pixels on the longest side.

    Here is the first, a Pelican landing I took in San Diego. I liked the landing pose, but the shadow of the head in the wing was bothersome.
    This does not reflect my usual routine and is only meant as an educational example.

    I selected the opposite wing, the pa\rt closest to the body, by quick mask. You can use whatever selection method you are familiar with.
    Copied and pasted over the shadow. Edit>Transform>Flip horizontally and now all I had to do is reduce the opacity to place it as close to the original as possible. If it's not consistent, you can use the Edit<Transform>DIstort command, using the Warp option (on the Tool bar on top. After it is placed as you want it, create a layer mask and paint black with the brush to clean the parts you don't want. White will paint them back.

  2. #2
    Julie Kenward
    Guest

    Default

    Great technique, Fabs...one I really need to practice more.

  3. #3
    BPN Viewer
    Join Date
    Jan 2008
    Location
    Torrington, CT
    Posts
    726
    Threads
    76
    Thank You Posts

    Default

    I didn't know you could do that! (If I had a nickel for everything I don't know about PS....). This is a great idea for a forum.

  4. #4
    Forum Participant
    Join Date
    Jan 2008
    Location
    Green Valley, AZ
    Posts
    2,323
    Threads
    597
    Thank You Posts

    Default

    Attached Images Attached Images
     
    Hi Folks: Noticed if you click on the "Pending Image" it can be viewed so I will start over again, and try to explain photo. . . . .

    Was up Madera Canyon on a very overcast day trying to get a photo of a hummingbird under tough conditions, on a narrow patio overhanging a creek with large flower pots of roses and other plants. I took this photo, and will attempt to show you what I did . . . Uncle Gus.

    First I saved original as a PSD file, opened it in CS3, cropped out the Leaf on bottom left, flipped it horizontal & saved as PSD. Made duplicate layer of original to start, and copied leaf on original as I wanted to see how it would fit in. As it was the top layer I positioned it so the beak would enter in the center of bud, then with the eraser at around 60% opacity I erased so beak would show under leaf. At the same time I gently erased other parts of leaf to blend in with BG. I then cropped photo to where I liked it. Then with clone starting at 400 size & opacity 60 (I change size and opacity as I go along) I finished project. I could have used Mask for the leaf, however, This was an old method I had used before.
    Last edited by Gus Hallgren; 08-18-2008 at 09:27 AM.

  5. #5
    Fabs Forns
    Guest

    Default

    Great PS work, thanks for sharing it, Gus!

  6. #6
    Axel Hildebrandt
    Guest

    Default

    Great idea and well explained, thanks!

  7. #7
    Paul Marcellini
    Guest

    Default

    Attached Images Attached Images
     
    I usually try to expose to the right to reduce noise and here's an example of bring back an image that was maybe too much to the right. This also works to reduce contrast of midday shots. So here's the raw:

  8. #8
    Paul Marcellini
    Guest

    Default

    Attached Images Attached Images
     
    And here's the worked image: I did the usual acr work, bring back highlights, bring up shadows, then the big trick...in photoshop for mac you hit command+option+~(tilde) and it selects the brights and feathers them. Then hit command+j to make a new layer from that. Then set that layer to blend mode to multiply. This may overdo the darken but you can mask/drop opacity.

    From there i did some minor levels and contrast work. Then gausian blur on the background. Not a show stopper, but a way to bring back images.

  9. #9
    Forum Participant
    Join Date
    Jan 2008
    Location
    Green Valley, AZ
    Posts
    2,323
    Threads
    597
    Thank You Posts

    Default Before & after Savannah Composite

    Hi Fabs:

    Seeing that photos need permission and take awhile to show up, also 3 photos take a post and a reply, I am linking to mine on my website:
    http://unclegus.150m.com/Savannah/Before_After_Savannah.htm

    Photos : 1 is Savannah plains in Kenya Africa taken by Gina
    2 is Cheetah taken in Kenya by Gina
    3 is preliminary for finishing touch.
    4 is Finished

    I started out by opening Savanna.jpg and saving it as a PSD file .

    I then opened Cheetah.jpg as a PSD file, cropped it to show mostly the Cheetah only, and then I flipped it horizontal to have the Cheetah looking in from the left side. Then resized it with a judgment call at 25% of BG size.
    As I saved the original I could always change it if I wanted to.

    I the pressed “V” (move) and dragged the Cheetah to left bottom corner of BG for starters.

    Having had a preliminary look at Cheetah placement, I clicked eye icon in front of Cheetah layer to turn it off, and with BG only showing I pressed “C” (crop) and cropped the savannah BG. I didn’t like the single Zebra way out by itself to the right, so I pressed I pressed “S” (clone), sized it to fit over Zebra, 40. (Sizing done with left bracket key (smaller) right bracket key (larger), set opacity on menu bar to 60, then held down Alt key and left clicked on grass close to zebra. Then clicked over Zebra to clone selected grass over it.

    I then clicked eye icon on Cheetah layer to reveal it

    With Cheetah revealed I clicked on Cheetah layer, above in Layer box I changed Opacity to 50%. At 50% Zebras & Wildebeest showed through Cheetah, so I decided to clone out them out under the Cheetah with grass. First I had to know where to clone. With Cheetah layer still selected, I pressed “E” (eraser), as this was going to be a rough cut out I set hardness to 100% & Opacity to 100% for a quick preliminary view of where Cheetah was located, then I clicked Cheetah eye icon to show background only and cloned grass to area that will be under Cheetah. Then clicked eye icon again to reveal Cheetah and make sure that is layer I’m working on. You now have Photo #3 Preliminary: http://unclegus.150m.com/Savannah/Before_After_Savannah.htm

    Now comes the fun part: Boy, I’m sure Windy . . . eh! J

    Pressing “V” (move) I move Cheetah to where I think I want him.
    Then I go to View and enlarge size to 200%. Next, I open eraser, set hardness to 0 (zero), and opacity 35% and carefully erased surplus outside Cheetah. To check on your erasing, click eye icon on BG, then you can view Cheetah alone and clean up any thing you missed. Click BG eye icon again to check finished product. Then adjust Cheetah opacity to suit your taste.

    Then use your regular work flow or parts of it to enhance your masterpiece

    Save this finished project as it is, you might want to change a layer later. Then go to Layers>Flatten Image.

    I went back and rotated Horizon fairly level. I’m sure you all know how to do that.

    Keep Smiling

    Uncle Gus :D

    BTW: I didn't use Background Eraser because no matter where you set Tolerance on Menu bar because the difference df definition between subject and BG was not defined very much.

    Also same with Extract which works great with well defined objects. it wasn't worth doing as I would still have a lot of erasing to do. Try it, you may like it: Choose Filter>Extract, Select Edge Highliter Tool (Top One) Brush size default is 20. Carefully outline object you want to extract. Then choose Fill Tool (Paint bucket) click inside the outline you want to extract. Fill will show you extraction. If satisfied click OK. Has clean up tools in extract, but I choose to use eraser after extraction. Have fun . . . :cool:
    Last edited by Gus Hallgren; 08-20-2008 at 06:07 PM.

  10. #10
    Forum Participant
    Join Date
    Jan 2008
    Location
    Green Valley, AZ
    Posts
    2,323
    Threads
    597
    Thank You Posts

    Default Very Simple Composite Before & after

    Attached Images Attached Images
     
    Hi Fabs:
    Taking the eyes from the plumage of a Preening Peacock that Gina photographed in Kenya, Africa, 2005 and a Trichocereus Fying Saucer that I photographed in our garden I mentioned how I put them in a composite . . . Have fun . . . Uncle Gus :D
    Last edited by Gus Hallgren; 08-24-2008 at 07:24 PM.

  11. #11
    Julie Kenward
    Guest

    Default

    Gus, I just wanted to let you know that Fabs is out for about a week on a personal matter. I'm sure her intent is not to abandon everyone after she got this rolling but I'm sure she'll check back in once she can. Because this is her thread I doubt too many other moderators check it but hang in there...she'll be back in a couple of days and probably very excited to see the work you are all doing.

  12. #12
    Forum Participant
    Join Date
    Jan 2008
    Location
    Green Valley, AZ
    Posts
    2,323
    Threads
    597
    Thank You Posts

    Default

    Attached Images Attached Images
     
    OK; This is how I did it: Opened the Peacock BG in CS3. Then I opened Trichocereus. I selected Trico, pressed V (Move) and dragged it onto the Peacock BG, I did this twice and put them where I thought they would look best. In the Layers window I now have #2 Trico on top, next #1 Trico, then background.
    First I click on #2 Trico In Layers, click "Opacity" directly above it and play with Opacity.
    Then I click on #1 Trico and do the same
    If you want to adjust Background, Click on Background Layer. I then clicked "Eye Icon" on both Trico layers to hide them temporarily and enhance Background to suit as you usually enhance photos

    Then I clicked both Trico eye icons to reveal all layers.
    I then clicked on each Trico layer one at a time, pressed "E" (eraser) set preliminary size to 175 (Adjust size to suit as I go along) Hardness at "0", and "Opacity" on Menu Bar to 20 and erase edges to my personal taste.

    Before I finalized I played with Trico Opacity, and moving them around.

    When finished I save it as a PSD file retaing layers for future corrections. Then I flattened layers, checked I was at BPN size limits. When satisfied, I clicked File>Save For Web & Devices, Clicked on Quality and adjusted size shown under left bottom corner of image to under 200 KB (This will remove your EXif and save it as a JPG)

    Have Fun

    Uncle Gus aka WABI
    Last edited by Gus Hallgren; 08-22-2008 at 03:09 PM.

  13. #13
    Forum Participant
    Join Date
    Jan 2008
    Location
    Green Valley, AZ
    Posts
    2,323
    Threads
    597
    Thank You Posts

    Default

    Thank you, Julie, it's nice to hear a voice in the wilderness . . . Regards . . . Uncle Gus

  14. #14
    Forum Participant
    Join Date
    Jan 2008
    Location
    Green Valley, AZ
    Posts
    2,323
    Threads
    597
    Thank You Posts

    Default

    Hi Peter: Wonderful image you made from your original photo . . Thanks for sharing . . . Uncle Gus :D

  15. #15
    Maxis Gamez
    Guest

    Default

    Hi Gus,

    As Julie said, I'm sure Fab will get back to you!

  16. #16
    Forum Participant
    Join Date
    Jan 2008
    Location
    Green Valley, AZ
    Posts
    2,323
    Threads
    597
    Thank You Posts

    Default Plastic Surgery

    Attached Images Attached Images
     
    Hi Fabs:

    Was determined to capture a Hummingbird photo in the garden this morning. Pickings were slim & I got one photo. Stubborn Swede I am, I looked at photo and decided it needed surgery. No Dinero, so it was DIY. Here's how I did it . . . .

    Saved original as PSD file, and opened in CS3. Opened it screen size, pressed "C" (crop), and cropped a copy of the left wing. then flipped it. Saved it. Original & wing now both on work place.

    Made wing current, pressed "V" (move) it was now top item in Layers list window. Manouvered it to where I wanted it, at least until it was close. Pressed "E" (eraser), hardness 0, opacity to start with 60, to erase surplus around wing. As I got closer to wing I reduced size and opacity for the fine work. When about half surplus cleaned off I pressed "V" and moved it into final position, pressed "E" again & continued erasing around wing.

    Then I clicked on Background in Layers to make it current pressed "E" and erased parts covering wing replacement.

    Then I clicked eye icon in front of wing layer to hide wing. Then with BG current I pressed "S" (clone) hardness 0, Opacity at 60 (Would adjust opacity lower as I got down to finishing touches) and cloned away hummingbird feeder. When that was cloned away, I set size about 3/16" and cloned tip of beak to make it pointed.

    Then I pressed "Q" (quick Mask) pressed "B" brush sized it slightly bigger than width of beak, hardness "0" and painted bottom 1/2" of beak. pressed "Q" Pressed ctrl + I to invert selection so only tip of beak was selected, then pressed ctrl + J to make adjustment layer (dancing ants disappear) then press "V" to move the beak in place about 1/4" longer than original. When that was completed I pressed ctrl E to close adjustment layer.

    Easy to understand "Quick Mask" and other tutorials on Robert Otoole's APTATS-1 instructional CD at http://www.birdsasart.com/aptats.htm

    The I clicked in front of wing layer to unhide it.
    Then clicked BG eye icon to hide it,
    Clicked on wing layer to make it current, pressed "E" and fined tuned the erasing to the wing.

    Saved the project as a PSD file adding PRG to filename. Saved it in my Projects folder. This way I can work layers again if needed.

    Then I went to Layers>Flatten image, and fine tuned photo . . .

    Keep smiling

    Gus
    Last edited by Gus Hallgren; 08-25-2008 at 08:04 AM.

  17. #17
    Fabs Forns
    Guest

    Default

    Hey Gus,

    Thanks for sharing your editing. I still have not figure out how to approve the attachment, I'll have eto have James help here :o:o
    You'll be happy to know there will be a special place for these tips soon :)
    Thanks for your great idea!!!

  18. #18
    Forum Participant
    Join Date
    Jan 2008
    Location
    Green Valley, AZ
    Posts
    2,323
    Threads
    597
    Thank You Posts

    Default

    Hej Fabs:

    Great to have you back, we all missed you.

    Big hugs

    Gus

  19. #19
    Jeni Williams
    Guest

    Default

    :(:(:(:(:(:(:o:o:o Why aren't some of you guys in S.A???
    This is precisesly what I'm trying to learn but find it difficult without seeing it first!!:o
    Age related thingy you know.........

  20. #20
    Robert Amoruso
    Guest

    Default

    Quote Originally Posted by Fabs Forns View Post
    Hey Gus,

    Thanks for sharing your editing. I still have not figure out how to approve the attachment, I'll have eto have James help here :o:o
    You'll be happy to know there will be a special place for these tips soon :)
    Thanks for your great idea!!!
    Fabs,

    I approved the attachments. Go along the date header to the right and select the checkbox, then go to the drop-down menu on the bottom right of the thread under Moderation and select approve attachments and hit go. That will do it.

  21. #21
    Robert O'Toole
    Guest

    Default

    Quote Originally Posted by Gus Hallgren View Post


    Easy to understand "Quick Mask" and other tutorials on Robert Otoole's APTATS-1 instructional CD at http://www.birdsasart.com/aptats.htm


    Gus
    Thanks for the mention and the credit Gus! I appreciate it. Nice work also.

    Robert

  22. #22
    Publisher Arthur Morris's Avatar
    Join Date
    Dec 2007
    Location
    Indian Lake Estates, FL
    Posts
    32,557
    Threads
    1,438
    Thank You Posts

    Default

    Quote Originally Posted by Jeni Williams View Post
    :(:(:(:(:(:(:o:o:o Why aren't some of you guys in S.A??? This is precisesly what I'm trying to learn but find it difficult without seeing it first!!:o Age related thingy you know.........
    A few things here. It is rare that anybody invents anything new in photography or in Photoshop. I had never heard of Quick Masks until Robert O'Toole mentioned them to me, oh, about three years ago... And at the time I was good friends with some folks who turned out to be Photoshop heavyweigths... As is usual, I was slow to listen and a slow learner. I remember Robert sitting patiently with me explaining how to use Quick Masks. With a bit of practice, I became competent. When I realized that I was using one or more (or many!) QMs on 95% of my images for a variety of tasks, I asked Robert to create a tutorial with screen captures so that folks could learn what he had taught me, and, so we could both make a few bucks. Thus APTATS was born. Big on acronyms, I came up with "Advanced Photoshop Tips and Techniques Simplified." Robert is not the world's greatest writer so I spent a good many hours honing his text, making sure that it was clear and understandable. Though it was a minor collaboration Robert was the brains behind the project.

    Finally on to Jeni. APTATS is available through BIRDS AS ART. It contains five detailed tutorials on how to use Quick Masks. But the best part of it is that once you have the basics down, you will find yourself uising them for dozens and dozens of chores. There is a link on the home page and we routinely send a great variety of products to six continents. I rarely speak the words Quick Mask in a sentence without mentioning Robert O'Toole.
    BIRDS AS ART Blog: great info and lessons, lots of images with our legendary BAA educational Captions; we will not sell you junk. 30+ years of long lens experience/e-mail with gear questions.

    BIRDS AS ART Online Store: we will not sell you junk. 35 years of long lens experience. Please e-mail with gear questions.

    Check out the new SONY e-Guide and videos that I did with Patrick Sparkman here. Ten percent discount for BPN members,

    E-mail me at samandmayasgrandpa@att.net.


  23. #23
    BPN Viewer
    Join Date
    Jan 2008
    Location
    Torrington, CT
    Posts
    726
    Threads
    76
    Thank You Posts

    Default

    Will these tutorials only work inCS or will they work with Elements also?

  24. #24
    Robert O'Toole
    Guest

    Default

    Quote Originally Posted by carole wiley View Post
    Will these tutorials only work inCS or will they work with Elements also?
    Hi carole,

    Well ASAIK Elements does not offer Quick mask or layer masks. Sorry I dont have elements so I cannot give you a complete list.

    I would recommend a CS upgrade, some of the missing features are really worth the upgrade cost.

    Robert

  25. #25
    Robert O'Toole
    Guest

    Default

    Well google found these CS3 features missing in Elements 6:

    * CMYK and LAB color modes
    * More tools and features that work with high-bit (16-bit and 32-bit) images
    * Combine multiple exposures to create high dynamic range (HDR) images
    * Channels Palette
    * Recording custom Actions (for batch processing)
    * Adjustments: Color Balance, Match Color
    * Layer Masks, Layer Comps, and Quick Mask mode
    * Smart Objects, Smart Guides
    * Lens Blur Filter
    * Vanishing Point Tool
    * Pen tool and paths palette
    * Some adjustment layers (curves, color balance, selective color, channel mixer)
    * Editing History Log
    * Text on a path, advanced text formatting
    * Advanced Layer Style manipulation
    * Advanced Color Management
    * Advanced Web features (rollovers, slicing)
    * Customizable tool presets, keyboard shortcuts, and menus
    * In the features and tools that are shared, the Photoshop version usually offers more advanced options for fine tuning and control.

    Hope this helps.

    Robert

  26. #26
    Howard Burkert
    Guest

    Default

    I also use the Quick Mask technique on a daily basis. The APTATS CD is a great investment. It has hundreds of uses, for indoor and outdoor portraits as well. We need more APTaTS CD's.
    Best,
    Howard

  27. #27
    Publisher Arthur Morris's Avatar
    Join Date
    Dec 2007
    Location
    Indian Lake Estates, FL
    Posts
    32,557
    Threads
    1,438
    Thank You Posts

    Default

    Mr. O'Toole has been working on APTATS II for way too long. Perhaps someone could give him a kick in the butt for me. The Average Blur Color Balance alone will be worth the price. Thanks BTW Howard for you more than kind words.
    BIRDS AS ART Blog: great info and lessons, lots of images with our legendary BAA educational Captions; we will not sell you junk. 30+ years of long lens experience/e-mail with gear questions.

    BIRDS AS ART Online Store: we will not sell you junk. 35 years of long lens experience. Please e-mail with gear questions.

    Check out the new SONY e-Guide and videos that I did with Patrick Sparkman here. Ten percent discount for BPN members,

    E-mail me at samandmayasgrandpa@att.net.


  28. #28
    BPN Viewer
    Join Date
    Jan 2008
    Location
    Torrington, CT
    Posts
    726
    Threads
    76
    Thank You Posts

    Default

    Okay, I guess I will have to upgrade to CS just to get the APTATA tutorials, this quick mask thing seems like it would be quite handy.

  29. #29
    Forum Participant
    Join Date
    Jan 2008
    Location
    Green Valley, AZ
    Posts
    2,323
    Threads
    597
    Thank You Posts

    Default Add a water reflection

    Attached Images Attached Images
     
    Hi Folks:

    Will add a water reflection to this image.

    Uncle Gus
    Last edited by Gus Hallgren; 10-05-2008 at 12:39 PM.

  30. #30
    Forum Participant
    Join Date
    Jan 2008
    Location
    Green Valley, AZ
    Posts
    2,323
    Threads
    597
    Thank You Posts

    Default

    Attached Images Attached Images
     
    This is image with water reflection added . . . . .

    This is how I did it . . . . First, I created a Java Lake Applet here: http://unclegus.150m.com/IndexOZ3.html
    When you click on this link, if you don't have Java on your system you will be asked if you want to d/l Sun Java, click "Yes". It will do no harm to your system, and if you don't like it, you can reverse the installation.

    Then I viewed the Java application rippling away, and captured the image using Hypersnap. http://www.hyperionics.com free trial available. Hypersnap is the fastest and easiest way to take screen captures from Windows screen

    That simple . . .

    Uncle Gus:D

    BTW: You can add Rain, Wind, Thunder, Lightning, and a boat moving across the rippling lake if you are adventurous ~ http://unclegus.150m.com/IndexOZ1.html :eek:
    Last edited by Gus Hallgren; 10-05-2008 at 12:41 PM.

  31. #31
    Fabs Forns
    Guest

    Default

    Wow, Uncle Gus, you did great! Thanks for sharing this!

  32. #32
    Jeni Williams
    Guest

    Default

    Quote Originally Posted by Arthur Morris View Post

    Finally on to Jeni. APTATS is available through BIRDS AS ART. It contains five detailed tutorials on how to use Quick Masks. But the best part of it is that once you have the basics down, you will find yourself uising them for dozens and dozens of chores. There is a link on the home page and we routinely send a great variety of products to six continents. I rarely speak the words Quick Mask in a sentence without mentioning Robert O'Toole.
    Thanks so much, I have already ordered Aptats ( arrived yesterday) and am now just waiting for your Book and CD too! Also got John Shaw's CD on CS3 as per your advice in a Bulletin.
    Am sure that will help. - I'm just impatient to learn everything that I see!
    I got CS3 end May, before that never used anything apart from Red- eye and cropping
    (Microsoft Picture Manager) from a P/S camera so with having started "proper"photography in March, am finding everything like a double - whammy between the eyes at the moment. :eek::cool:
    I want to do everything, get frustrated because I don't know how.... BUT I will get there.:o:D
    (Just please excuse all the questions in the meantime)
    Last edited by Jeni Williams; 10-05-2008 at 10:06 PM.

  33. #33
    Forum Participant
    Join Date
    Jan 2008
    Location
    Toronto, Canada
    Posts
    8,458
    Threads
    682
    Thank You Posts

    Default

    Read everything you can get your hands on Jeni, including the educational resources section on this site! There is a ton of information.

  34. #34
    Jeni Williams
    Guest

    Default

    Thanks Jackie, I do. Just suffering from brain overload. Maybe need to sit back and learn one thing at a time.

  35. #35
    Forum Participant
    Join Date
    Jan 2008
    Location
    Green Valley, AZ
    Posts
    2,323
    Threads
    597
    Thank You Posts

    Default

    Hi Jeni:

    You have ordered all the right stuff. However, IMHO, Arties "Digital Basics File" PDF http://www.birdsasart.com/digitalbasics.htm can be on your computer tomorrow as it
    is a fast download. Another bonus with "Digital Basics" is that updates for free, and Artie's
    described "Workflow" is worth the price of admission by its lonesome, and you get tons of
    good tips as well. The CD is great, over 900 pages, but might overwhelm you at first.

    Take it easy, one day at a time.

    Uncle Gus

  36. #36
    Jeni Williams
    Guest

    Default

    Thanks Oom Gus, that was the first one I bought.;) It's what I've been using to do the editing so far.:D

  37. #37
    Forum Participant
    Join Date
    Jan 2008
    Location
    St. Charles, Missouri
    Posts
    362
    Threads
    28
    Thank You Posts

    Default

    Quote Originally Posted by carole wiley View Post
    Okay, I guess I will have to upgrade to CS just to get the APTATA tutorials, this quick mask thing seems like it would be quite handy.
    Carole,
    A quick note: CS4 has just been announced and should be available shortly (most online retailers will let you pre-order). So I wouldn't bother with CS3 at this point.
    Chris

  38. #38
    Forum Participant
    Join Date
    Jan 2008
    Location
    Green Valley, AZ
    Posts
    2,323
    Threads
    597
    Thank You Posts

    Default

    Hi Chris; Adobe took orders for CS4 last week, and it will be delivered or downloaded October 14th. Remember before you remove CS3 to "De-activate" it from your system so it can be installed again if necessary. It is said the CS4 is a big upgrade. Uncle Gus

  39. #39
    BPN Member Paul Lagasi's Avatar
    Join Date
    Feb 2008
    Location
    Bells Corners, Ontario, Canada
    Posts
    5,316
    Threads
    642
    Thank You Posts

    Default Hawk Owl

    Attached Images Attached Images
     
    This type of Owl is always high in tree, very seldom, can you see him at eye level, day was crappy, overcast and had to use 1.7 exposure comp to get details of Owl to come out but hated background.
    Saw this thread and sent this in as example:
    Using white paintbrush to slowly go along edge of owl and tree I wanted to keep in shot...I do this so as not to lose any edge details.
    Using magic wand to mask, the hit Select - Modify - Contract by 1, copied it.
    Selected a background I wanted to use, performed a gussian blur and pasted photo of Owl in.
    Cropped to size
    Using clone tool cleaned up edge of bird and tree (small bits of old background )
    Sharpened....adjusted brightness and contrast....Done

  40. #40
    Caleb Royer
    Guest

    Default B&A Bluebird

    Attached Images Attached Images
     
    Here is my before and after.

    I gave it a vertical crop, I selected the birds body and lightened it the reason I selected the body is because if I did not select it the log in the BG would have looked brighter also and that would be distracting.
    I gave it some contrast,sharpened it, and finally added some saturation.

    I am sorry but you will have to click on the attachment if you want to see the photo:o
    Last edited by Caleb Royer; 03-26-2009 at 10:37 PM. Reason: the photo is not showing up

  41. #41
    BPN Viewer
    Join Date
    Mar 2009
    Location
    Burns, OR
    Posts
    312
    Threads
    18
    Thank You Posts

    Default

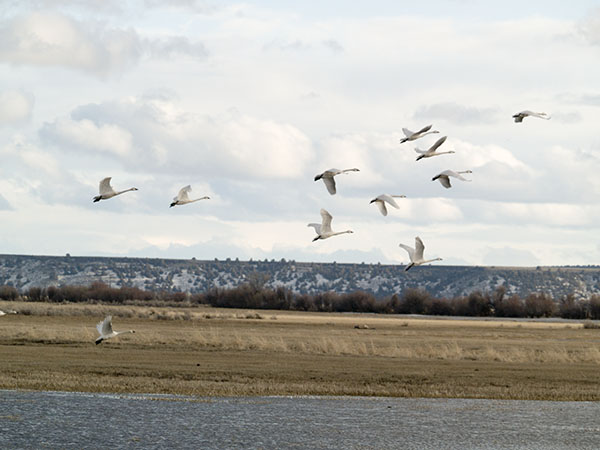
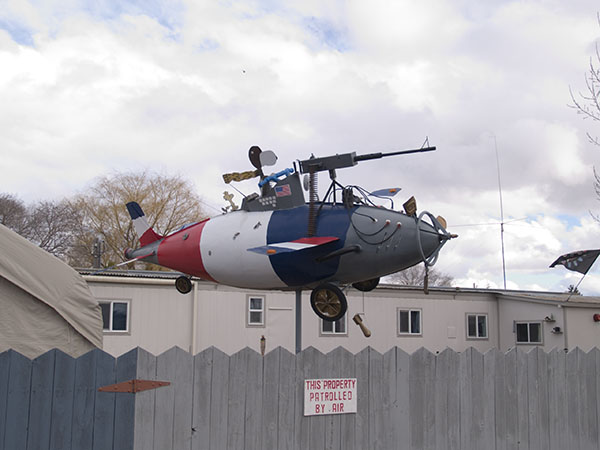
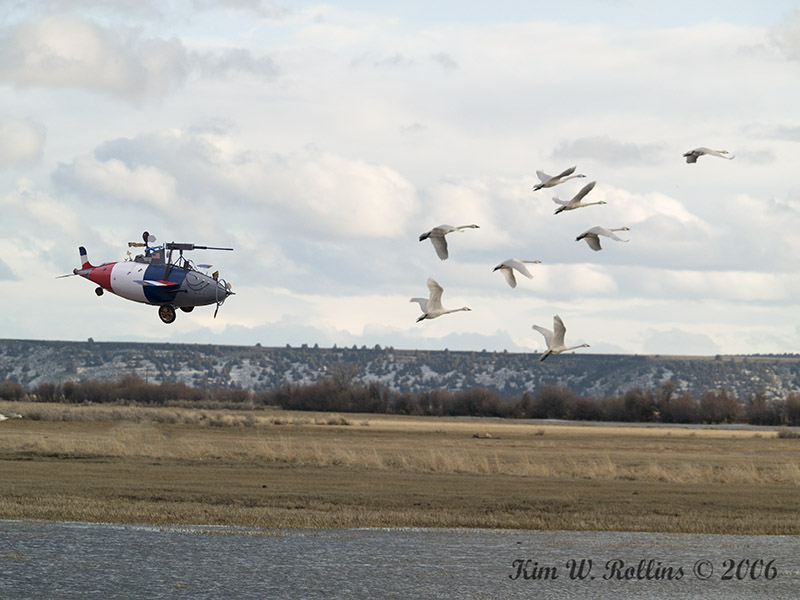
    I just ran across this thread and found it interesting and thought I would share this. I sometimes like to have a bit of fun and ... did have some fun with this one.

    Before -


    other before -


    After -


    When I first made this I posted it on another forum, some Oregon Birder saw it and had a fit, nasty email was here the next morning, lectured about wildlife being harassed, how birders don't like photographers anyhow...

    I just started laughing and returned an email that said-
    "LOL! Do you really believe this is a picture of Snoopy really chasing swans?"
    I guess they really had not looked at this or at least after that question I did not hear another thing from them.

  42. #42
    Charlie VanTassel
    Guest

    Default

    Of course he should have known. Snoopy's best friend is a bird (Woodstock).

  43. #43
    Alfred Forns
    Guest

    Default

    .... everyone knows Snoopy doesn't fly that plane .. he is partial to the Sopwith Camel the plane credited with shooting the Red Baron :)

  44. #44
    BPN Viewer
    Join Date
    Oct 2008
    Location
    Washington, D.C.
    Posts
    1,225
    Threads
    14
    Thank You Posts

    Default

    Quote Originally Posted by carole wiley View Post
    Will these tutorials only work inCS or will they work with Elements also?
    There's a free layer mask add-on for Elements. I used it with Elements 3.0 for several years before I got my first full version of Photoshop.

    http://graphicssoft.about.com/od/pse...ermasktool.htm

  45. #45
    Forum Participant
    Join Date
    Feb 2008
    Location
    Costa Rica
    Posts
    4,547
    Threads
    253
    Thank You Posts

    Default

    Attached Images Attached Images
     
    Can this work? I gave it a try and used you picture, hope you don' t mind.

  46. #46
    Publisher Arthur Morris's Avatar
    Join Date
    Dec 2007
    Location
    Indian Lake Estates, FL
    Posts
    32,557
    Threads
    1,438
    Thank You Posts

    Default

    APTATS II will be shipping in mid-DEC!
    BIRDS AS ART Blog: great info and lessons, lots of images with our legendary BAA educational Captions; we will not sell you junk. 30+ years of long lens experience/e-mail with gear questions.

    BIRDS AS ART Online Store: we will not sell you junk. 35 years of long lens experience. Please e-mail with gear questions.

    Check out the new SONY e-Guide and videos that I did with Patrick Sparkman here. Ten percent discount for BPN members,

    E-mail me at samandmayasgrandpa@att.net.


Posting Permissions

  • You may not post new threads
  • You may not post replies
  • You may not post attachments
  • You may not edit your posts
  •  
Web Analytics